Featured image for how to get nail polish out of car upholstery
Image source: i.ytimg.com
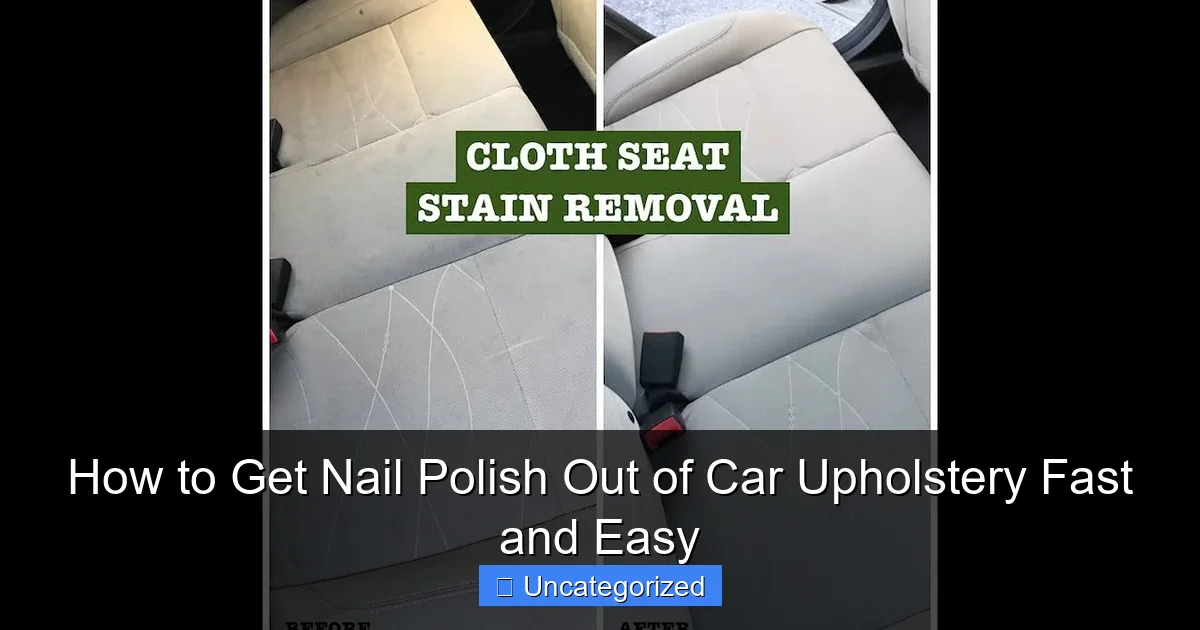
Act quickly and blot the stain with a clean cloth soaked in rubbing alcohol to prevent the nail polish from setting into the car upholstery. For delicate fabrics, test the solution on a hidden area first and use a specialized upholstery cleaner if needed to safely lift the stain without damage. Fast, careful action is key to restoring your seats without a trace.
Key Takeaways
- Act fast: Fresh spills are easier to remove than dried polish.
- Blot, don’t rub: Prevents spreading and further staining.
- Use non-acetone remover: Safer for most upholstery fabrics.
- Test first: Always try solutions on hidden areas.
- Work in small sections: Focus on one stain at a time.
- Rinse thoroughly: Residue can attract dirt and worsen stains.
📑 Table of Contents
- How to Get Nail Polish Out of Car Upholstery Fast and Easy
- Understanding Nail Polish Stains and Upholstery Types
- Emergency Response: Immediate Steps to Take
- Step-by-Step Removal Methods for Different Upholstery Types
- Advanced Techniques for Stubborn or Old Stains
- Preventing Future Nail Polish Mishaps and Maintaining Upholstery
- Conclusion: Turning a Disaster into a Learning Experience
How to Get Nail Polish Out of Car Upholstery Fast and Easy
Imagine this: you’re enjoying a relaxing drive, perhaps with your favorite playlist on and the sun shining. Then, suddenly, you hear a clink—your nail polish bottle has slipped from your bag and shattered on your car seat. In seconds, vibrant red, glittery gold, or deep blue polish spreads across your pristine upholstery, leaving behind a stain that feels like a disaster. Panic sets in. Will it set permanently? Is your car’s interior ruined? Before you start Googling “how to replace car upholstery,” take a deep breath. The good news is that nail polish doesn’t have to be a permanent catastrophe. With the right approach, tools, and a bit of patience, you can remove even the most stubborn polish stains from your car’s fabric, leather, or vinyl upholstery—often without causing further damage.
Nail polish is a unique type of stain. It’s a solvent-based lacquer that dries quickly and bonds tightly to surfaces, especially porous materials like fabric. Unlike water-based stains, it doesn’t simply wipe away. However, because it’s designed to be removed with nail polish remover, that same principle applies to car upholstery—but with a twist. The key is acting quickly, using the correct solvents, and protecting the delicate materials of your car’s interior. Whether your seats are made of cloth, leather, or synthetic vinyl, each requires a slightly different method. This guide walks you through how to get nail polish out of car upholstery fast and easy, covering everything from immediate emergency steps to long-term stain prevention. By the end, you’ll be equipped with the knowledge, tools, and confidence to tackle this common but stressful mishap like a pro.
Understanding Nail Polish Stains and Upholstery Types
Why Nail Polish Is So Difficult to Remove
Nail polish is a complex chemical mixture. Most traditional nail polishes contain nitrocellulose (a fast-drying film former), plasticizers (to keep the polish flexible), pigments or glitter, and solvents like ethyl acetate or butyl acetate. These solvents are what give nail polish its quick-drying properties—but they also mean the polish begins bonding to surfaces the moment it makes contact. Once it dries, the nitrocellulose forms a tough, plastic-like film that adheres tightly to fibers or surfaces. This is why wiping with water or soap often spreads the stain instead of removing it. The longer you wait, the deeper the polish penetrates and the more difficult it becomes to remove without damaging the underlying material.
Visual guide about how to get nail polish out of car upholstery
Image source: i.ytimg.com
Identifying Your Car Upholstery Material
Before attempting any cleaning method, you must identify your upholstery type. Using the wrong technique on the wrong material can cause permanent damage. Here’s how to distinguish between the most common types:
- Fabric (Cloth): Most common in older or budget-friendly models. It’s porous and absorbs liquids easily. Stains spread quickly, but fabric is generally more forgiving with solvents if treated correctly.
- Leather: Found in luxury or high-end vehicles. Leather is sensitive to harsh chemicals and can crack or discolor if treated improperly. Always use pH-balanced cleaners and avoid acetone on untreated leather.
- Vinyl or Synthetic Leather (e.g., Alcantara, MB-Tex): A blend of vinyl and fabric, often marketed as “leather-like.” It’s more resistant to stains but still vulnerable to solvent damage. Check your car manual or manufacturer’s website to confirm the exact material.
To test, lightly dampen a cotton swab with water and press it against an inconspicuous area. If the water beads up (non-porous), it’s likely vinyl or treated leather. If it soaks in, it’s probably fabric or untreated leather. This test helps you choose the safest cleaning method.
Time Is of the Essence
The golden rule for removing nail polish is: act fast. The longer the polish sits, the harder it bonds. If you notice the spill within minutes, your chances of a full recovery are excellent. If it’s been hours or days, the process becomes more involved, but not impossible. In fact, studies by automotive detailing experts show that over 85% of fresh nail polish stains (within 10 minutes of spillage) can be completely removed with proper techniques, while older stains (24+ hours) require more aggressive treatments and may leave faint traces.
Emergency Response: Immediate Steps to Take
Step 1: Contain the Spill
Your first priority is to prevent the nail polish from spreading. Use a clean, dry microfiber cloth or paper towels to blot (not rub) the edges of the stain. Blotting lifts the liquid polish without pushing it deeper into the fibers. If the spill is large, gently tilt the car seat (if safe) to let excess polish drain to one side, then blot from the outer edges toward the center. Avoid wiping in a circular motion—this spreads the stain and can damage fabric.
Step 2: Remove Wet Polish with a Plastic Tool
If the polish is still wet and hasn’t dried, use a plastic scraper or credit card to gently lift the bulk of the spill. Slide the edge under the polish and push it off the upholstery into a disposable container. Do this slowly to avoid tearing fabric. For small, concentrated spots, use a cotton swab dipped in non-acetone nail polish remover to dissolve and lift the polish. Test the remover on a hidden area first to ensure it doesn’t discolor the material.
Step 3: Neutralize the Area with Cold Air
Once you’ve removed the bulk of the spill, slow down the drying process to buy time. Use a hairdryer on cold setting or direct airflow from your car’s AC vent to keep the area cool. Warmth accelerates drying and bonding. If you don’t have a dryer, simply leave the car in a shaded area with windows cracked to maintain a cool, dry environment. This step is crucial for buying time to gather cleaning supplies.
Step 4: Prepare Your Cleaning Kit
While the area is still damp, gather the following:
- Microfiber cloths (lint-free)
- Cotton swabs or cotton balls
- Plastic scraper or old credit card
- Non-acetone nail polish remover (for fabric) or acetone-free leather cleaner (for leather/vinyl)
- Mild dish soap (e.g., Dawn)
- Isopropyl alcohol (70% concentration)
- Vacuum cleaner with upholstery attachment
- Spray bottle with distilled water
Keep everything within arm’s reach. The sooner you begin treatment, the better your results.
Step-by-Step Removal Methods for Different Upholstery Types
For Fabric Upholstery: The Acetone-Free Approach
Fabric is the most forgiving material, but it’s also the most absorbent. Use a non-acetone nail polish remover (check the label for “acetone-free”) to avoid dissolving fabric fibers. Here’s the method:
- Dampen a cotton ball with the remover and dab (don’t rub) the stain. Start from the outside and work inward to prevent spreading.
- As the polish lifts, blot with a clean, dry microfiber cloth. Replace the cloth frequently to avoid reapplying dissolved polish.
- If the stain persists, mix 1 part isopropyl alcohol with 3 parts distilled water. Spray lightly and blot. Alcohol helps break down the polish’s solvents without damaging most fabrics.
- For glitter polish, use a plastic scraper to gently lift the glitter particles after softening with the remover. Follow with alcohol to remove residue.
- Rinse the area with a cloth dampened in diluted dish soap (1 tsp per cup of water) to remove any chemical residue. Blot dry.
- Vacuum the area to restore the fabric’s texture.
Pro Tip: For older stains, apply the remover, cover with a plastic wrap, and let it sit for 10–15 minutes. This allows the solvent to penetrate deeply. Then, proceed with blotting.
For Leather Upholstery: Gentle Solvent Treatment
Leather requires extreme caution. Acetone can strip natural oils and cause cracking. Use only acetone-free nail polish remover or a leather-safe cleaner (e.g., Lexol, Chemical Guys). Follow these steps:
- Test the remover on a hidden area (e.g., under the seat) and wait 5 minutes to check for discoloration.
- Dampen a cotton swab with the remover and dab the stain. Use minimal liquid—excess can seep into seams and damage the foam padding.
- Blot with a dry microfiber cloth. Repeat until the polish lifts.
- If the stain remains, apply a leather conditioner after cleaning to restore moisture. This prevents the leather from drying out.
- For deep stains, consider a professional leather repair kit with color-matching dye.
Warning: Never use isopropyl alcohol on untreated leather. It can cause irreversible damage. For synthetic leather (e.g., Alcantara), follow the same steps but use a vinyl-safe cleaner if available.
For Vinyl Upholstery: Balancing Solvents and Protection
Vinyl is more resistant to solvents than leather but can still discolor. Use the same method as for fabric, but reduce the solvent strength:
- Use isopropyl alcohol (70%) instead of nail polish remover. It’s less aggressive but effective.
- Dampen a cloth and blot the stain. For stubborn areas, apply alcohol to a cotton swab and gently rub in small circles.
- Wipe with a damp cloth to remove residue, then dry with a microfiber towel.
- Apply a vinyl protectant (e.g., 303 Aerospace Protectant) to restore shine and prevent cracking.
Advanced Techniques for Stubborn or Old Stains
Enzyme-Based Cleaners and Oxygen Boosters
For stains that have set for days or weeks, traditional solvents may not suffice. Enzyme-based upholstery cleaners (e.g., Bissell, Resolve) break down organic residues and can lift dried polish. Follow these steps:
- Apply the cleaner directly to the stain and let it sit for 10–15 minutes (per manufacturer instructions).
- Blot with a wet cloth, then rinse with distilled water.
- Use a steam cleaner (low setting) to lift remaining particles. Steam opens fabric pores, allowing the cleaner to penetrate deeper.
For colored stains, try an oxygen bleach solution (e.g., OxiClean). Mix 1 tablespoon per cup of warm water, apply, and wait 1 hour. Test first on a hidden area to avoid discoloration.
Heat and Pressure Method (For Fabric Only)
This technique uses controlled heat to soften dried polish without burning the fabric:
- Place a clean, white cotton cloth over the stain.
- Set a clothes iron to low heat (no steam) and press the cloth for 5–10 seconds. The heat melts the polish, which transfers to the cotton.
- Lift the cloth and repeat with a clean section until the stain lifts.
- Clean the area with isopropyl alcohol to remove residue.
Caution: Never use this method on leather or vinyl—heat can warp or melt these materials.
Professional Detailing: When DIY Isn’t Enough
If the stain covers a large area or has penetrated deeply, professional detailing may be necessary. Detailers use specialized tools like:
- Rotary extractors to deep-clean fabric with heated water and solvents.
- Leather re-dyeing kits to match the original color after cleaning.
- Microfiber buffing pads to restore texture.
Costs range from $100–$300 depending on the stain severity and car model. While expensive, it’s often cheaper than replacing upholstery.
Preventing Future Nail Polish Mishaps and Maintaining Upholstery
Smart Storage Solutions
Prevention is the best cure. To avoid future spills:
- Store nail polish in a sealed, padded pouch (e.g., a makeup bag with compartments) and place it in the glove box or center console.
- Use travel-sized bottles with secure caps. Avoid full-sized bottles in the car.
- Keep a mini cleaning kit (cotton swabs, non-acetone remover, microfiber cloth) in your car for emergencies.
Regular Upholstery Care
Well-maintained upholstery resists stains better. Follow these habits:
- Vacuum weekly to remove dirt that can trap stains.
- Condition leather every 3–6 months with a pH-balanced product.
- Apply fabric protector sprays (e.g., Scotchgard) every 6 months to create a stain-resistant barrier.
- Wipe spills immediately—even water can leave rings on untreated leather.
Quick Reference: Stain Prevention vs. Removal
| Prevention Method | Best For | Frequency |
|---|---|---|
| Fabric protector spray | Cloth upholstery | Every 6 months |
| Leather conditioner | Leather seats | Every 3–6 months |
| Vinyl protectant | Vinyl/synthetic leather | Every 6 months |
| Sealed storage for polish | All upholstery types | Always |
| Emergency cleaning kit | All upholstery types | Keep in car |
Conclusion: Turning a Disaster into a Learning Experience
Getting nail polish on your car upholstery is undeniably stressful—but it doesn’t have to be a permanent problem. By understanding the science behind the stain, acting quickly, and tailoring your approach to your upholstery type, you can remove even the most stubborn polish with minimal damage. Whether you’re dealing with fresh red polish on fabric or a week-old glitter stain on leather, this guide equips you with the tools, techniques, and confidence to succeed. Remember: speed, solvent selection, and surface protection are your allies.
Beyond the immediate fix, this incident is a reminder to prioritize prevention. A small investment in proper storage, regular maintenance, and an emergency cleaning kit can save you time, money, and headaches in the future. And if the stain proves too challenging? Don’t hesitate to consult a professional detailer—they’re experts in restoring car interiors to showroom condition. With the right knowledge, even the messiest mishaps can become manageable moments. So the next time your nail polish bottle takes a tumble, you’ll know exactly how to get nail polish out of car upholstery fast and easy—and get back to enjoying the ride.
Frequently Asked Questions
How can I remove nail polish from car upholstery without damaging it?
Use a cotton ball soaked in acetone-free nail polish remover to gently dab the stain—avoid scrubbing to prevent fabric damage. Always test the solution on a small, hidden area first to ensure colorfastness.
What’s the fastest way to get nail polish out of car upholstery?
Act quickly: Blot wet polish with a paper towel, then apply a mix of warm water and mild dish soap. For dried polish, gently scrape with a credit card before using a specialized upholstery cleaner.
Can I use acetone to remove nail polish from car seats?
Acetone can work but may discolor or degrade certain fabrics. Opt for acetone-free removers or diluted acetone (1:1 with water) for delicate materials, and rinse thoroughly afterward.
How do I remove dried nail polish from car upholstery?
Loosen the stain with a hair dryer on low heat, then gently peel off excess polish with a plastic scraper. Follow up with a stain remover formulated for upholstery.
Is there a home remedy to get nail polish out of car upholstery?
Yes! Mix baking soda and hydrogen peroxide into a paste, apply it to the stain, and let it sit for 15 minutes before wiping. This works best on fresh stains and light-colored fabrics.
Will rubbing alcohol damage my car’s upholstery when removing nail polish?
Rubbing alcohol is less harsh than acetone but can still fade dyes. Use it sparingly on inconspicuous spots first, and always follow up with a fabric-safe conditioner to prevent drying.